How To Replace a Cabin Air Filter in a Ford Escape
The cabin air filter is a part you need to replace every so often. How often, though?
Ford recommends replacing the cabin air filter every 15K-20K miles. If you start experiencing the symptoms of a dirty cabin air filter (which includes persistent bad odors and reduced airflow into the cabin), then you want to check the air filter to see if it has any life left. If it is obviously full of dust and dirt, it's time to replace it.
Where to Find a Replacement Cabin Air Filter

The first thing you have to do is to get a replacement cabin air filter. You can either buy one at a Ford dealership or order one online. If you’re looking for the best prices, OEM cabin filters are much cheaper online. In fact, we offer wholesale pricing for genuine OEM replacement cabin air filters. You’ll save up to $20 on a single cabin air filter if you order from us.
Replacing the air filter takes about 5-15 minutes, depending on your expertise. If you have a shop replace the cabin air filter for you, you’re looking at about $100 in labor. Shops charge about $100 per hour for labor, and even if the job takes only 5 minutes, they’ll still charge you for a whole hour of labor.
It’s so easy to replace the cabin air filter that there’s really no point in bringing your car to a Ford shop. To replace the cabin filter on a Ford Escape, you just need a Torx driver and the set of instructions below.
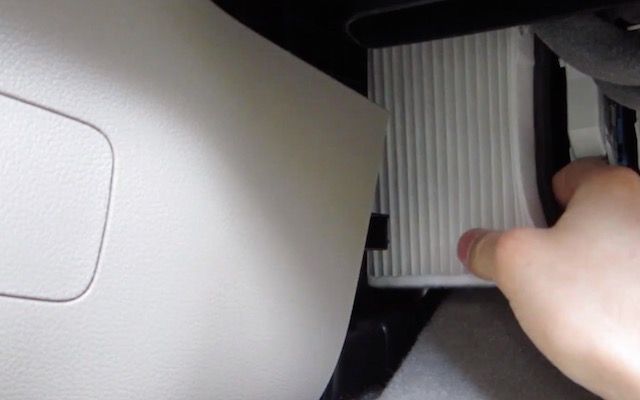
How to Replace the Cabin Air Filter on Your Ford Escape
Replacing the cabin air filter is a straightforward process. However, the location of the cabin air filter is not always the same on all Ford models. For example, on some models the air filter can be accessed from under the glove compartment, and some other models have the air filter behind the glove compartment.
This tutorial is for the Ford Escape. If you have another Ford model, you can find another tutorial online that’s specific to your model.
Without further ado, here’s how you can change the cabin air filter on your Ford Escape:
- Park your car and make sure that the engine is off.
- Go to the front passenger side and then open the door.
- Look under the glove box and then find the bottom panel cover.
- There are two screw caps (one at each end of the bottom panel cover). With your fingers, pull down the screw caps to remove them.
- Carefully pull down the cover panel.
- There’s a small Torx screw located at the bottom of the filter cover. Remove it with a T-20 Torx driver.
- Remove the filter cover and then pull the cabin air filter out of the slot.
- Insert the new cabin air filter into the slot.
- Place the filter cover back in place and then fasten it with the Torx screw.
- Push the cover panel back into place.
- Reinstall the screw caps.
That’s all! If you have any questions, you can get in touch with us either by phone or via our contact form.